You’ve spent hours carefully crafting your presentation and decided there’s enough good content to share. Why not then go the extra mile to make your presentation accessible for all who might want to view, quote, comment, or read it?
To get started, here are seven steps you can take to make your work accessible to all—even if they can’t see the images.
I’ve focused on PowerPoint because it’s the most widely used, but the principles behind these tips apply equally to any program.
1. Make Text Easy to See
When it comes to text, just because your presentation software offers you an almost infinite number of combinations of font, size, and color, doesn’t mean you should use them. These tips will help your entire audience:
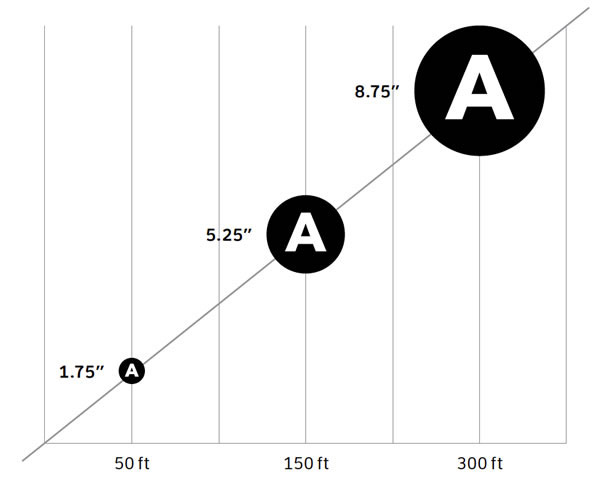
- Make sure text is large enough to read comfortably. Start with your body text at 24-28 points, and adjust other text for a good visual hierarchy. Think about reading on both small and large screens and for people close to or far from a projected screen (Figure 1).
- Check for good contrast. Don’t let your text fade into the background by using two colors that blur into each other. Get it right and you’ve also made the text readable for people who are color-blind. Use one of the many easy tools that will tell you when there’s enough contrast, for example contrastchecker.com. And Lighthouse International has provided more useful advice on choosing colors.
- Don’t write text in ALL CAPS. Words that are familiar are easier to read, and we see far more text in mixed case (like this sentence) than in all capital letters.
- Avoid too many bold or fancy fonts. An unusual font can lift your presentation, but don’t go crazy. If someone is struggling to make out the words, they’ll be distracted from the message. If you are uploading the presentation to a platform such as SlideShare, make sure it handles your quirky font well.
2. Provide Text Alternatives to Describe Images
If your image is important enough to deserve space on a slide, it’s important enough to describe in what’s called alt text. As the name implies, alt text is an alternative for people who can’t see an image. Screen reader software reads this text so they know what’s in the image.
To add alt text in PowerPoint, find the Format Picture dialog (usually a right click in the picture), then navigate to Alt Text at the bottom of the list. You can usually ignore the Title field since most screen readers will only pay attention to Description. Write a clear explanation of what you are aiming to communicate with your illustration. I’ve shared more information on how to write good alt text in this presentation.
Table 1. Quick rules for writing alt text
| If the image contains… | The alt text should… |
| Text | Repeat the text |
| Visual information | Explain it |
| Sensory information | Describe it |
| Nothing new | Keep it very short (if you can’t make it “null”) |
3. Make Data Charts and Tables Accessible
Ideally you should use PowerPoint’s built-in options for tables, charts, and data visualizations, rather than importing your own or placing them on the slide as an image. This will save you time because accessibility tools are already built into them.
If you can’t do this, it’s likely you’re going to need a lot of words to explain what is in your table or chart image. If so, don’t try to pack all of your words into the alt text. Instead, you can choose from one of these three solutions:
- Put the longer text into the PowerPoint notes area
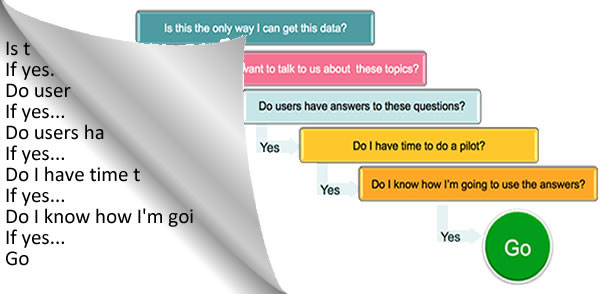
- Hide the text under the image (Figure 2)
- Explain the image in visible text
In all three cases, the alt text for the image can simply tell the reader what the image is, and where it is described.
4. Don’t be Distracting
Avoid the temptation to ”brighten up” your presentation with loopy transitions and text flying onto the page, blinking, flashing, scrolling, or animated text. We all know these hideous tricks are tragically last century. But I thought I’d better mention them here just in case you get asked to include them.
Think about the last time you were in a bar where a TV was playing in a corner—and how impossible it was not to keep looking over at it. Flashing text is the presentation equivalent: bad for usability and even worse for accessibility. If your presentation isn’t going to hold their attention without design tricks, perhaps you need to look at your content again.
5. Get the Order Right
Figuring out the order for assistive technology to read a slide visually is easy. PowerPoint arranges the elements in the order in which they have been added to the slide, but that might not be very useful if you are trying to understand the content through a screen reader. So you have to make sure that assistive technology reads the separate elements on each slide in a sequence that makes sense.
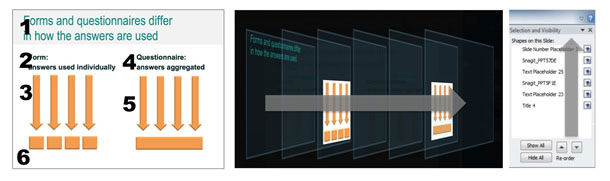
PowerPoint organizes all of the elements on a slide into layers that determine the both the reading order and the visual presentation of any overlapping elements (as shown in Figure 3). To set the reading order, move the layers around until they are in the order you want. You can check the reading order by using the [TAB] key to select each of the elements in turn.
6. Use Master Slides
You’ll make life a lot easier if you use PowerPoint’s built-in master slides. You can customize them of course, but the reading order will already be set in the master.
In fact, use as many of the built-in formatting options as you can to make the job easier for you and whichever of the accessibility technologies your audience may be using. For example, if you want bullet points, use what PowerPoint offers you. If you want to make them fancy, define that in the formatting controls rather than introducing your own custom-built bullet points which will have to be image files and therefore need explaining.
7. Practice Good Housekeeping
How long it takes to apply these basic accessibility principles will depend on how many slides you have and how many of them include hard-to-explain data and imagery. What is certain is that even the most straightforward presentation will take some time to adapt.
So if you do a lot of presentations, introducing some basic housekeeping will make the whole process less taxing, until it gets to the point of being more or less automatic.
What do I mean by good housekeeping? Well, setting up some master slides for your organization would be a good start. You might also want to:
- Set the language in the file properties (so screen readers know how to pronounce the words).
- Get into the habit of writing your alt text as you go, while your mind is clearly on the message and composition of whichever slide you are working on.
- Make the native PPT files available. If you must make a PDF file, use Office for Windows to make an accessible, tagged PDF. However, this isn’t a perfect solution and you’ll still have to check that the PDF file is also fully accessible using the built-in tools in Acrobat.
- If you are posting on SlideShare or similar sites, make sure the original file can be downloaded so that assistive technology like screen readers have access to the source. You want all the accessibility features you’ve just worked so hard on to be available.
Check the Accessibility
Recent versions of Microsoft Office for Windows offer you a way of checking your work. You can find its accessibility checker tool on the File tab under Check for issues.
Alternatively, you could do some testing with friends or colleagues, but be wary of leaning too heavily on those who use assistive technology. As a friend with a visual impairment told me, he was rather bored of being asked to be a free tester again and again, however good our intentions.
You may also want to check out the Accessible Digital Office Document (ADOD) Project, which is a fantastic resource for step-by-step instructions, by version, for Microsoft Office, Adobe Acrobat, InDesign, and a number of other popular office programs.
This is just a start, but for most presentations, these seven steps will go a long way toward making sure that everyone can read your slides. Accessible design is also good design.
[greybox]Special thanks to Jane Matthews and Caroline Jarrett for their help developing this article. They are using these tips to make a large body of presentations accessible.[/greybox]

Whitney combines a fascination with people and an obsession to communicate clearly with her work bringing user research insights to designing products where people matter. She's also passionate about elections, and leads the Center for Civic Design with Dana Chisnell. Her books are Storytelling for User Experience, GlobalUX, and A Web for Everyone. Twitter: @whitneyq and @awebforeveryone
1 Comment
Comments are closed.